Pickett Demonstration Giants · Volume 3
The Pickett Demonstration Rule — Volume 3 — Teaching with It, and Caring for It
Pickett's classroom method with checked examples, and how to clean, hang, store and move a seven-foot rule printed on paint
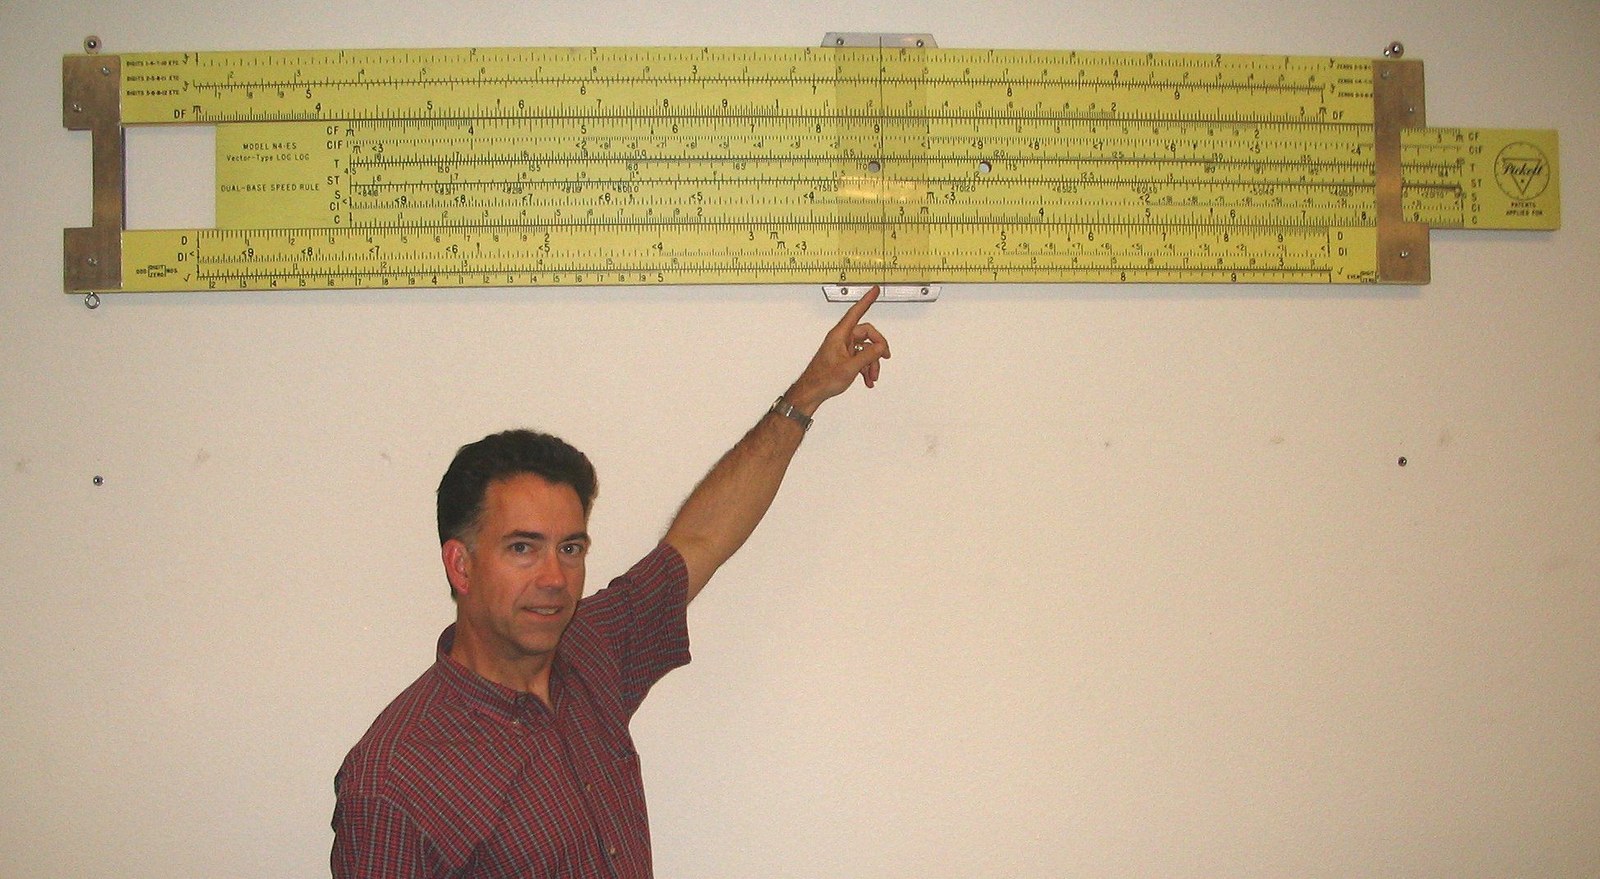
Figure 1 — The demonstrator’s whole purpose: one setting, made large, for a room to read. A seven-foot Pickett N4-ES on the wall of Acorn Product Development, Fremont, California. Image: International Slide Rule Museum, https://sliderulemuseum.com/DemoSR.shtml.
3.1 About This Volume
Vol 1 placed the Pickett demonstrators in their classrooms and Vol 2 took one apart. This volume does two things. First it shows how the giant was meant to be used, following Pickett’s own Teaching Guide by Maurice L. Hartung of the University of Chicago — a sequence of classroom settings worked here on a four-foot rule, with every number checked by calculation. Then it turns to care. A demonstration rule is a long, thin assembly of painted plywood, aluminium and acrylic, with its scales printed on the paint. Each of those materials has its own enemies, and the sheer size of the thing — it cannot be put in a drawer — brings problems of its own: warping, hanging, storage and getting it through a door.
The arithmetic itself is the arithmetic of any slide rule and is taught in full in Using a Slide Rule Vols 1–4; this volume concentrates on what is different when the rule is seven feet long and the audience is a class.
3.1.1 Depth-Index: The Pickett Demonstration Rule Unit
Table 1 — Depth-Index: The Pickett Demonstration Rule Unit
| Vol | Title | Primary Content |
|---|---|---|
| 1 | The Giants of the Classroom | Why demonstration rules existed, Pickett’s free-rule offer, the 4-ft and 7-ft models, other makers, dating, identifying mine |
| 2 | Anatomy and the Scales | Plywood stock and slide, aluminium end plates, slider inserts, cursor, hanging eyes and brackets, the scale sets of the N1010, N902, N4, N3 and N500 demonstrators |
| 3 | Teaching with It, and Caring for It (this volume) | Pickett’s own teaching method, worked classroom examples all checked, then cleaning, the slide, the cursor, hanging, storage and transport |
3.2 Teaching with a Giant
3.2.1 Pickett’s method
Hartung’s Teaching Guide (Pickett Manual 601, © 1960) was written for junior- and senior-high teachers, many of whom, it admits, “have not had extensive experience in teaching the slide rule.” It runs in twelve sections, from introducing the rule through multiplication, approximation, scientific notation, the A, B, K and CI scales, logarithms and the trig scales. The demonstrator is woven through it. The pattern is always the same:
- The teacher sets the problem on the big rule, in full view.
- Every student sets the same problem on his or her own rule and reads the answer.
- The class compares — and anyone whose reading differs can see at once, on the wall, where the hairline should be.
The guide’s advice on practice is worth quoting, because it is the opposite of drill: “The large demonstrator rule may be used to give them settings to read, and they should each write the numerals on paper. They should also make settings that correspond to given numbers. Prolonged practice is not wise, however. The most effective practice comes with actual computation, where the correct answer serves as a check on the settings” (Hartung, 1960, Section 2).
3.2.2 Holding and working the big rule
Hung above a blackboard, a demonstrator is worked with the hands at the end plates and a pointer for the cursor. The habits that make settings clean on a ten-inch rule apply even more on a seven-foot one:
- Move the slide from its end, not from the middle: a long plywood slide pushed in the middle can bow and bind.
- Set the cursor from one direction, coming up to the mark rather than overshooting and pulling back.
- Stand aside after each setting. The teacher’s body is the biggest obstruction in the room.
- Read from straight in front. A class sees the hairline from many angles; the teacher should check the setting from the centre of the room, where most of the students are.
3.2.3 The opening lesson: 2 × 3 = 6
The guide’s first instruction is to set the simplest possible product on the demonstrator: “set 1 on the C scale over 2 on the D scale. Set the hairline of the cursor over 3 on the C scale and show the class that the answer, 6, may be read on the D scale under the hairline. … Move the cursor hairline to 4 on the C scale and show that 2 × 4 = 8 may now be read on the D scale” (Hartung, 1960, Section 1).
On a four-foot demonstrator with 40-inch scales, the left index of C now sits 12.04 inches along D (40 × log 2). The 3 on C is a further 19.08 inches along (40 × log 3); together they reach 31.13 inches, which is 40 × log 6 — the 6 on D. Check: log 2 + log 3 = 0.30103 + 0.47712 = 0.77815 = log 6. Having seen the slide physically add those two lengths across the front of the room, a class understands why sliding multiplies; Using a Slide Rule Vol 1 explains the same principle on paper.
3.2.4 Reading the scales
Next the guide writes “2.34 × 36.8” on the board and turns to reading. On a ten-inch rule the 2.34 mark is 3.69 inches from the left index, among graduations a sixteenth of an inch apart; on the four-foot demonstrator it is 14.77 inches along, and the interval from 1 to 2 alone is a foot long. That is what makes it possible to teach the meaning of primary, secondary and tertiary graduations to a whole room at once: the teacher can point at the space between two marks and show where 136, and then 1365, would fall (Section 2).
Worked example — 2.34 × 36.8. Left index of C over 234 on D; hairline to 368 on C; read 861 on D. Estimate: 2 × 40 = 80, so 86.1. Check: 2.34 × 36.8 = 86.112.
3.2.5 Multiplication, estimation and the decimal point
The guide’s first multiplication set — chosen so that the left index works and nothing runs off the end — is 19.5 × 4.1, 2.42 × 296, 121 × 65 and 3.81 × 2.16. It insists that students estimate each answer first, by rounding: 19.5 × 4.1 is about 20 × 4 = 80 (Section 3).
Table 2 — Multiplication, estimation and the decimal point
| Problem | Read on D | Estimate | Answer | Check |
|---|---|---|---|---|
| 19.5 × 4.1 | 800 | 20 × 4 = 80 | 80.0 | 79.95 |
| 2.42 × 296 | 716 | 2.5 × 300 = 750 | 716 | 716.32 |
| 121 × 65 | 786 | 120 × 65 ≈ 8,000 | 7,860 | 7,865 |
| 3.81 × 2.16 | 823 | 4 × 2 = 8 | 8.23 | 8.2296 |
3.2.6 The off-scale problem, made visible
The guide’s next lesson is the one every student stumbles on: an answer that falls off the end. Its example is 28.3 × 5.46 (Section 3). “Have them set the left index of C over 283 on D. They will find that they cannot move the hairline over 546 of the C scale.”
On the demonstrator the reason is plain to see. The left index of C sits 18.07 inches along D (40 × log 2.83); 5.46 on C is a further 29.49 inches (40 × log 5.46); together that is 47.56 inches — 7.56 inches past the end of a 40-inch D scale. Now set the right index of C over 283 on D instead. The C scale’s 5.46 now falls 7.56 inches along D, which is where 1.545 lies (40 × log 1.545 = 7.56). Read 1545; estimate 30 × 5 = 150; the answer is 154.5. Check: 28.3 × 5.46 = 154.518. A class watching a four-foot slide hang 7½ inches beyond the stock, then come back from the other end, does not forget why there are two indexes.
3.2.7 Further lessons on an N1010 demonstrator
The same pattern carries through the rest of the guide’s sections, and the N1010 demonstrator carries every scale they use (Vol 2):
- Reciprocals (CI): with the hairline on 4 on C, read 25 on CI, so 1/4 = 0.25.
- Squares and square roots (A/B): hairline over 20 on A (its right half, 10–100), read 4.47 on D, so √20 = 4.472. Check: 4.4721² = 20.000.
- Cubes (K): hairline over 2 on D, read 8 on K, so 2³ = 8.
- Sines and tangents (S, T): on the N1010 the trig scales are on the slide, read against C with the slide closed: hairline to 30° on S, read 5 on C, so sin 30° = 0.5; hairline to 20° on T, read 364, so tan 20° = 0.364. Check: tan 20° = 0.36397.
A blackboard example from Pickett’s own catalogue. The drawing on Pickett’s “Wall Rules” page (Vol 2, Figure 5) shows a teacher at the demonstrator with 1.8 × 3520 ÷ π chalked on the board. Worked as a chain: left index of C over 18 on D; hairline to 352 on C (product 6336, not read); move the slide to bring the π mark on C under the hairline; read under the C index 2017 on D. Estimate: 2 × 3500 ÷ 3 ≈ 2,300, refined to about 2,000; the answer is 2,017. Check: 1.8 × 3520 = 6336; 6336 ÷ π = 2016.8.

Figure 2 — The demonstrator in its natural setting: a class with their own rules, and the giant above the board at the front. Image: International Slide Rule Museum (classroom photographs courtesy of Craig Kielhofer), https://sliderulemuseum.com/DemoSR.shtml.
3.3 Caring for a Demonstration Rule
A Pickett demonstrator is built of four materials — plywood, yellow paint with scales printed on it, aluminium, and acrylic — each vulnerable to different things, and the procedures below take them in turn. They are written for a rule in ordinary used condition, and they are deliberately cautious: the printed scales, once lost, cannot be put back.
3.3.1 Before anything else: look, and test
Lay the rule flat on a clean, padded surface — a table with a blanket, or two padded trestles placed under the end plates — and look along its whole length in good light:
- Is the stock or slide bowed or twisted? Sight down the edge.
- Is the plywood delaminating — veneers lifting at the edges or ends — or is there water staining (dark tide-marks, foxing, lifting paint)?
- Is the paint sound, or chalking, crazed or flaking? Are the printed scales crisp or worn?
- Are all the end-plate screws present and tight, or have any stripped their holes?
- Does the cursor have its hairline, and are its frame screws tight?
- Is anything a later replacement — screws, eyes, cursor — and is there any label, tag or inscription?
Photograph both faces and both ends before cleaning.
3.3.2 Dust and dirt on the painted scales
The scales are printed on paint, and both paint and print are far more delicate than the anodised and printed aluminium of a Pickett student rule.
- Start dry. Dust with a soft, wide brush (a clean, soft paintbrush or a photographic dusting brush) and a microfibre cloth, working along the scales, not across them.
- Test before using any water. Choose a small area away from the scales — the back of an end, under an end plate’s edge — and wipe it with a cloth barely damp with plain water. If yellow paint or black print comes off on the cloth, stop: that rule should be dusted only.
- If the test is clean, wipe a section at a time with a cloth wrung out until barely damp, with at most a drop of mild washing-up liquid in the water; follow at once with a cloth damp with plain water, then a dry one. Never let water stand, run into the slide channel, or reach the plywood edges.
- Classroom grime and chalk dust usually come off at step 1 or 3. Leave anything that does not.
What not to use on the painted faces: no solvents of any kind (alcohol, acetone, thinners, white spirit, citrus cleaners) — they soften old paint and lift printing ink; no abrasive pads, scouring powder or “magic” melamine sponges — they are fine abrasives and take the scales off with the dirt; no household spray cleaners with ammonia or solvents; no wax or furniture polish on the scales, which yellows, gathers dust and makes later cleaning harder.
3.3.3 The plywood
- Water is the enemy. Plywood absorbs moisture through its edges and ends, swells, and can delaminate; the paint over it then cracks and lifts. Many surviving demonstrators carry water stains from leaking school roofs and damp storage (Vol 2, Figure 1). Keep every cleaning cloth nearly dry and keep water off the edges.
- Do not sand, fill or repaint the faces. A flaking area can be stabilised by a conservator; repainting destroys the original print.
- Lifting veneer at an end can be re-glued with a small amount of wood glue, clamped gently between padded blocks — on unprinted areas only, and only if it is actively lifting.
3.3.4 The slide
A seven-foot slide that sticks makes the rule useless for teaching. In order of likelihood:
- Dirt in the channel. Slide the slide out (support its whole length as it comes — it is long and will flex), brush and vacuum out the channel, wipe the bearing edges with a barely damp cloth, and let everything dry fully before reassembly.
- Swelling from humidity. A slide that has taken up moisture binds; let the rule acclimatise for several days in a dry room before doing anything else.
- End-plate adjustment. Pickett’s end plates are adjustable (Vol 2). If the slide is uniformly too tight or too loose, slacken the end-plate screws a little at one end, ease the rails apart or together, and retighten — evenly, and without over-tightening into the plywood.
- Lubrication, if needed at all, should be dry: a little paraffin wax (a plain candle) rubbed on the bearing edges of the slide, not its faces. No oil, no grease, no silicone spray — oil soaks into plywood and stains the paint, and silicone overspray contaminates the printed faces and makes any later repair difficult.
3.3.5 The aluminium end plates and the screws
- Wipe the end plates with a damp cloth and dry them. Dull grey oxidation is normal and protective; leave it. If they must be brightened, a little non-abrasive metal cleaner on a cloth, kept strictly off the yellow paint, is the limit.
- Do not over-tighten screws into plywood. A stripped hole can be repaired by gluing a wooden toothpick or two into it, trimming flush, and re-driving the original screw — a common, reversible fix. Keep original screws; do not substitute larger ones.
3.3.6 The cursor
The acrylic window and its hairline are the most easily ruined part of the rule.
- Clean the acrylic with a soft cloth and plain water with a trace of mild soap, then dry it by blotting. Never use alcohol, acetone or ammonia-based glass cleaner on acrylic: they craze it with fine cracks that cannot be removed.
- Do not polish over the hairline. Plastic polishes are abrasive enough to thin or remove a printed or scribed line. Fine surface scratches elsewhere can be polished out with a plastic polish if necessary, keeping well clear of the hairline.
- If the cursor must come off (it slides off the end once the slide is removed, or its end bars are unscrewed), store it flat, wrapped in soft tissue, where it cannot be stood on.
- A missing or broken cursor can be replaced with a new acrylic window cut to size and fitted to the original bars, with a hairline scribed at right angles to the scales. Mark or record it as a replacement.
3.3.7 Hanging it
- Use both top eyes, always. Hang the rule from two hooks or two wires sharing the load equally and pulling straight up, not at an angle. A single eye carrying the whole rule, or an eye pulled sideways, can tear out of the plywood.
- Fix the hooks into something solid — wall studs or fixings rated well above the rule’s weight — not into plasterboard alone.
- Alternatively rest it on brackets under the stock near each end, as many owners do (Vol 1, Figure 1), so that the eyes carry nothing.
- Hang it level and flat to the wall, so it is not twisted.
- Keep it away from radiators, heating vents, kitchens (grease settles on the paint), bathrooms, exterior walls that run damp, and direct sunlight, which fades the yellow and the print and dries the plywood unevenly.
- If the slide and cursor are to stay where they are while hanging, a turn of low-tack painter’s tape on the aluminium end plates will hold them. Never put tape of any kind on the printed scales: it lifts the print when it comes off.
3.3.8 Storing it
- Flat and fully supported, or hanging. Do not lean a demonstrator against a wall on its end for months; it will take a permanent bow. Do not store it bridging two supports with its middle unsupported.
- Indoors, at ordinary room temperature and humidity (roughly 40–55% relative humidity). Garages, sheds, attics and cellars are where most demonstrators were ruined — damp warps and delaminates the plywood, heat and cold crack the paint.
- Covered against dust with a cotton sheet or acid-free tissue, not plastic sheeting, which traps condensation.
3.3.9 Moving it
A seven-foot rule is longer than most car interiors, and its weakness is bending.
- Lock it first. Hold the slide and cursor with low-tack tape across the end plates only, or remove the slide and cursor and pack them separately.
- Give it a rigid backer. Strap or tape (on the packaging, not the rule) the rule to a board or a timber frame longer than itself, padded with blanket. The French Graphoplex classroom rule in Figure 3 was shipped in exactly this way, its wooden frame part of the carton.
- Wrap it in a moving blanket or bubble wrap over a layer of tissue, so that nothing presses directly on the printed faces.
- Carry it with two people, one at each end, holding the stock or the backer — never the slide — and keep it flat, so that it does not flex in the middle.
- In a vehicle, lay it flat on the backer along the longest available line — a van, an estate car with the seats down, or a roof rack only if it is fully boxed and protected from rain.
- Let it acclimatise for a day in its new room before unwrapping it if it has come from the cold, so that moisture does not condense on the paint.
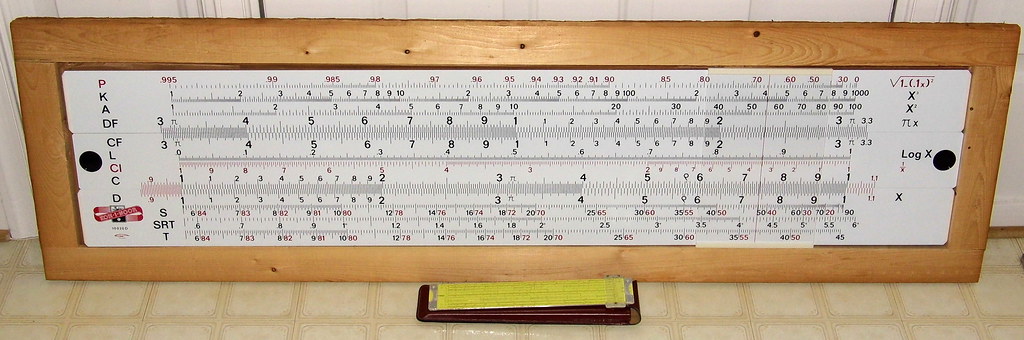
Figure 3 — How a giant is meant to travel: a 4 ft 4 in Koh-I-Noor Graphoplex 10020D classroom rule (France, c. 1970s) in the wooden frame that was part of its shipping carton; the twelve-inch Pickett in front gives the scale. Image: “Vintage Large Classroom Display Slide Rule, Koh-I-Noor Graphoplex Model 10020D …” by France1978, CC BY-SA 2.0, https://live.staticflickr.com/494/19834469631_0daf1c4fe6_b.jpg.

3.3.10 What not to do
- Do not use solvents, abrasive pads, melamine sponges or spray cleaners on the painted scales.
- Do not soak, hose or wet the plywood.
- Do not oil or grease the slide.
- Do not clean the acrylic cursor with alcohol, acetone or ammonia.
- Do not stick tape on the scales.
- Do not hang it from one eye, or from eyes pulled sideways.
- Do not lean it on its end for long periods, or store it in a garage, shed, attic or cellar.
- Do not sand, repaint or re-letter it.
Sources
- Hartung, Maurice L. Teaching Guide for Slide Rule Instruction, Pickett Manual 601 (Pickett, Inc., © 1960) — the classroom method (Sections 1–3), the example problems, and the catalogue “Wall Rules” page. ISRM manual M175 (filed in the Library). https://sliderulemuseum.com/Manuals/M175_Pickett_TeachingGuide_601.pdf. In this site’s Reference Library.
- Hartung, Maurice L. How to Use Trig Slide Rules (Pickett & Eckel, 1960) — operation of the 1010 and 902 scales. ISRM manual M104 (filed in the Library). https://sliderulemuseum.com/Manuals/M104_Pickett_HowToUseTrig_1960.pdf. In this site’s Reference Library.
- International Slide Rule Museum, “Demonstration Slide Rules.” https://sliderulemuseum.com/DemoSR.shtml
- Every worked example was checked by direct calculation: log 2 + log 3 = log 6; 40 × log 2 = 12.04 in; 40 × log 2.34 = 14.77 in; 2.34 × 36.8 = 86.112; 19.5 × 4.1 = 79.95; 2.42 × 296 = 716.32; 121 × 65 = 7,865; 3.81 × 2.16 = 8.2296; 40 × log 2.83 = 18.07 in, 40 × log 5.46 = 29.49 in, 28.3 × 5.46 = 154.518; 1/4 = 0.25; √20 = 4.4721; 2³ = 8; sin 30° = 0.5; tan 20° = 0.36397; 1.8 × 3520 ÷ π = 2016.8.
- Care guidance follows general conservation practice for painted wood, plywood, printed surfaces, aluminium and acrylic, applied to the demonstrators’ construction as described by Pickett and the ISRM.
Comments (0)