Pickett Demonstration Giants · Volume 2
The Pickett Demonstration Rule — Volume 2 — Anatomy and the Scales
Plywood, aluminium and plexiglass: how a giant teaching rule is built, hung and laid out
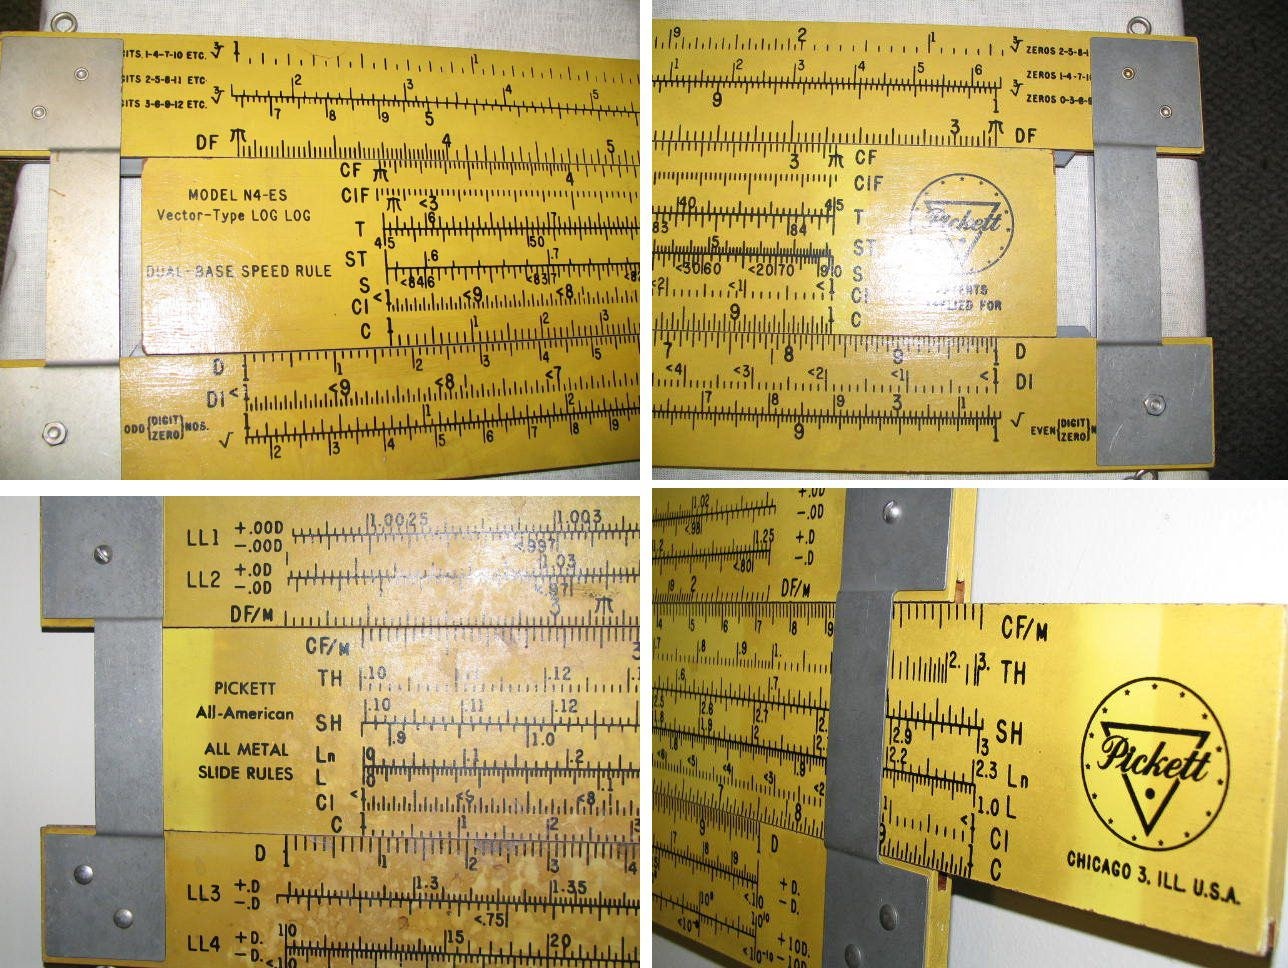
Figure 1 — The ends of a seven-foot Pickett N4-ES demonstrator, both faces. The model name and scale letters are printed on the yellow plywood; the grey aluminium end plates hold the two rails of the stock together; screw eyes at the corners take the hanging wires. Note the water staining on the lower-left panel. Image: International Slide Rule Museum, https://sliderulemuseum.com/DemoSR.shtml.
2.1 About This Volume
Vol 1 described the Pickett demonstration rules as a family — the models, the sizes, and how to tell them apart. This volume looks at how one is built. A demonstrator is not simply a big slide rule: Pickett’s student rules were all-aluminium, while the giants were plywood, and a seven-foot strip of wood behaves differently from a ten-inch strip of metal. The sections below go through the stock and slide, the end plates, the slider inserts, the cursor and the hanging hardware, then lay out the scale sets of the models Pickett offered and what the big scales gain. Using one in a classroom, and caring for one, is Vol 3.
2.1.1 Depth-Index: The Pickett Demonstration Rule Unit
Table 1 — Depth-Index: The Pickett Demonstration Rule Unit
| Vol | Title | Primary Content |
|---|---|---|
| 1 | The Giants of the Classroom | Why demonstration rules existed, Pickett’s free-rule offer, the 4-ft and 7-ft models, other makers, dating, identifying mine |
| 2 | Anatomy and the Scales (this volume) | Plywood stock and slide, aluminium end plates, slider inserts, cursor, hanging eyes and brackets, the scale sets of the N1010, N902, N4, N3 and N500 demonstrators |
| 3 | Teaching with It, and Caring for It | Pickett’s own teaching method, worked classroom examples all checked, then cleaning, the slide, the cursor, hanging, storage and transport |
2.2 The Stock, the Slide and the End Plates
2.2.1 Plywood, not aluminium
Pickett’s catalogue says the wall rules were “made of specially-treated plywood” (Hartung, 1960, catalogue pages), and the International Slide Rule Museum adds that Pickett normally used ⅜-inch or ½-inch plywood, with sheet-aluminium bars holding the stock together (ISRM). A slide rule is three strips: the stock (or body) is two long rails, upper and lower, with a channel between them; the slide runs in that channel. On a demonstrator each of the three is a strip of plywood, painted and printed.
The one documented set of dimensions is for a four-foot N1010-ES of about 1958: 48 × 9½ × ½ inches overall, with scales 40 inches long (Followingtherules, MJS-p-0202). The seven-foot rules are correspondingly longer and deeper; their exact proportions are best taken from an example rather than assumed.
The exceptions prove the rule. Pickett also made an all-metal four-foot teaching rule, the Math-Master, equivalent to its 1010 (ISRM), and the very early Model 2 Decipoint Trainer of about 1945 was white rather than yellow (Vol 1).
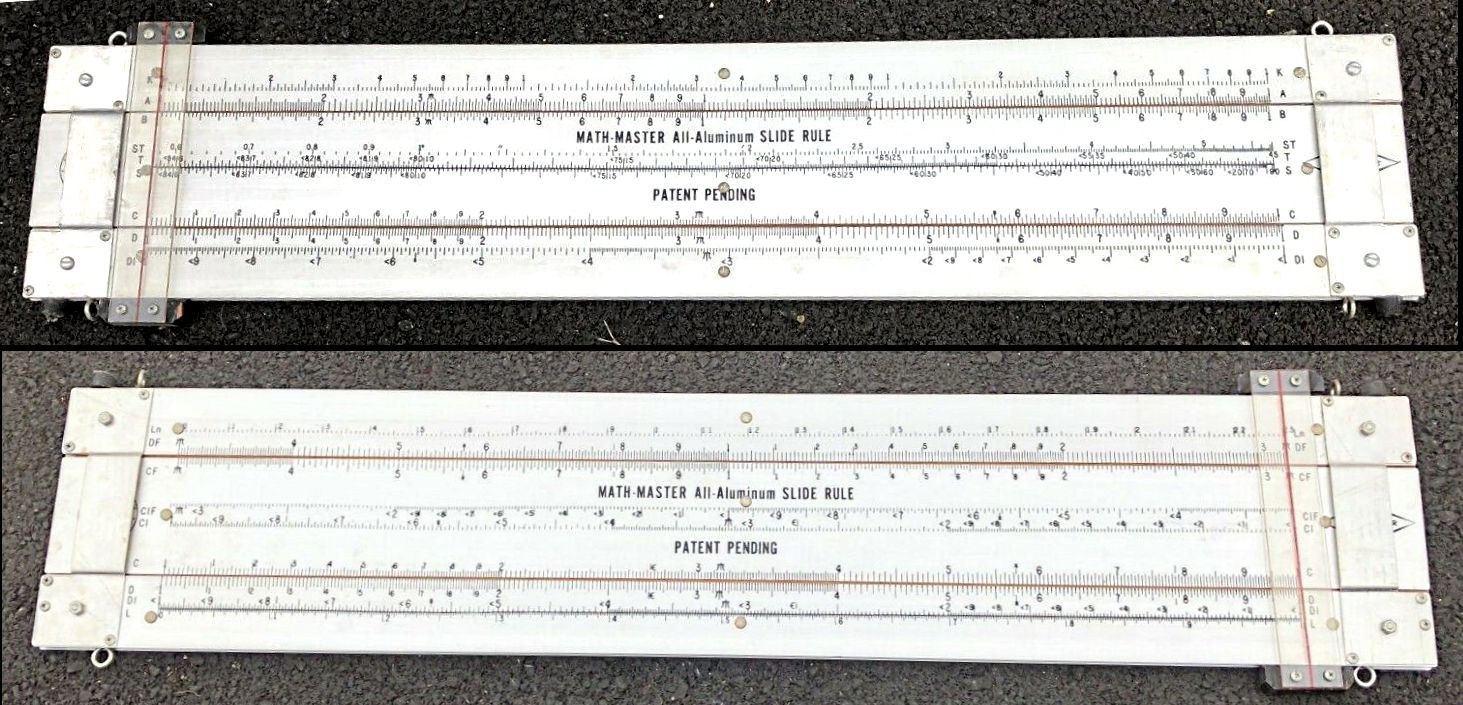
Figure 2 — The all-metal alternative: a four-foot Math-Master aluminium teaching rule made by Pickett, “Patent Pending.” Most Pickett demonstrators are plywood; this one is not. Image: International Slide Rule Museum, https://sliderulemuseum.com/DemoSR.shtml.
2.2.2 The end plates
At each end, flat aluminium plates are screwed across both rails on each face. Their shape — a broad plate on each rail joined by a narrower strap that steps across the end of the slide channel — is what holds the two rails parallel and at the right spacing, exactly as the metal end braces do on a wooden student rule. Pickett called them “adjustable metal end plates” (Hartung, 1960): loosening the screws lets the rails be set slightly closer or wider, which adjusts how firmly the slide is gripped. Retightened, the plates lock the setting.
This matters for the owner in two ways. The end plates are the strongest part of the instrument, and the right place to hold, support or tape it. And their screws go into plywood, where an over-tightened screw strips its hole — the commonest structural damage on survivors.
2.2.3 The slider inserts
The slide does not run wood-on-wood. The catalogue mentions “plastic inserts to assure easy slider action” — low-friction strips in the channel where slide and rails bear on each other (Hartung, 1960). On a seven-foot rule that is no luxury: the slide is heavy, long and liable to swell a little with humidity, and wood rubbing on painted wood would stick and wear the print. A slide that has become stiff is usually telling the owner about dirt, swelling or a disturbed end-plate adjustment; Vol 3 deals with each.
2.3 The Cursor
The cursor is a window of clear acrylic — “plexiglass,” in Cooper Hewitt’s description, and “hard-faced plastic … with a clearly defined hairline” in Pickett’s (Cooper Hewitt; Hartung, 1960). The window is held between aluminium bars along its top and bottom edges, fastened with small screws; the bars ride on the outer edges of the stock and carry the window across the face. On the duplex demonstrators the cursor has to serve both faces, as it does on the student rule.
The hairline is the instrument’s precision pointer, and on a demonstrator it is also the teacher’s: every setting the class reads is a hairline setting. It is cut or printed on the acrylic, and it is the first thing to be lost to careless cleaning (Vol 3).
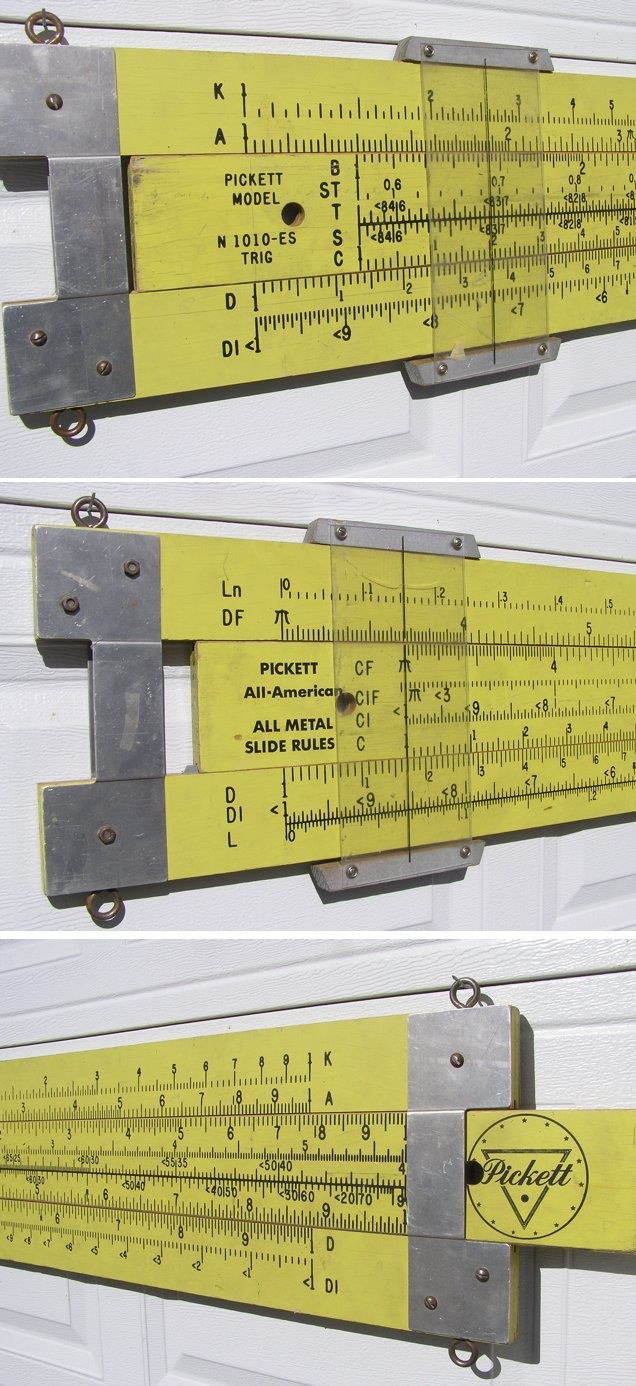
Figure 3 — The hardware of an N1010-ES: aluminium end plates screwed across the rails, a plexiglass cursor in aluminium end bars, and screw eyes at the top and bottom corners for hanging. The model name sits on the left end of the slide. Image: International Slide Rule Museum, https://sliderulemuseum.com/DemoSR.shtml.
2.4 The Hanging Hardware
Pickett designed the wall rules to work three ways: “easily handled and used at a podium,” or “suspended from the wall, ceiling or blackboard without impairing ease of use” (Hartung, 1960). The catalogue’s own drawing shows the usual classroom arrangement — the rule hung horizontally above the blackboard on two vertical wires or rods, high enough for the whole room to see and low enough for a teacher with a pointer to reach the slide and cursor (Figure 5).
The fittings that survive on most examples are screw eyes at the corners of the stock — at the top for the suspension wires, and on many examples at the bottom as well, which let the rule be tied back or chained so that it did not swing when the slide was pushed. Owners today hang them on hooks through the top eyes, or rest them on a pair of wall brackets (Vol 1, Figure 1). The original wires, ceiling fittings and blackboard clips were usually left behind in the school.
Because the screw eyes are threaded into plywood, they are a weak point: an eye pulled at an angle, or carrying the whole weight alone, can tear out. Vol 3 covers hanging one safely.
2.5 The Scales
The point of the demonstrator is that it duplicates a student rule, scale for scale, so whatever scales the class had in hand, the teacher had on the wall. Pickett’s catalogue says the demonstrators “duplicate both sides” of the N3, N4, N500, N902 and N1010 (Hartung, 1960). The scale names below are explained in Using a Slide Rule Vols 1–4.
2.5.1 N1010-ES Trig (duplex) — the commonest giant
From the examples photographed (ISRM; Followingtherules):
Table 2 — From the examples photographed (ISRM; Followingtherules)
| Face | Upper stator | Slide | Lower stator |
|---|---|---|---|
| Front | K, A | B, ST, T, S, C | D, DI |
| Back | Ln, DF | CF, CIF, CI, C | D, DI, L |
That is a complete general-purpose trig duplex: C/D for multiplication and division; CI, DI and CIF for reciprocals; the folded CF/DF; A/B for squares and K for cubes; S, T and ST for trigonometry; L for common logarithms and Ln for natural ones. It was the rule a high-school physics class needed, which is why it is the demonstrator that survives in the largest numbers.
2.5.2 N902-ES Simplex Trig
A one-sided rule with nine scales on the face — K, A, B, T, S, CI, C, D, L — and, on the student version, instructions, conversion factors and equivalents on the back (Hartung, 1960, catalogue pages). The four-foot demonstrator in Vol 1, Figure 5 shows the front. As the simplest of the trig rules it suited junior-high and first-year classes.
2.5.3 N4-ES Vector Log Log
Pickett’s advanced “Vector-Type Log Log Dual-Base Speed Rule.” The seven-foot demonstrator in Figure 1 shows cube-root and square-root scales with digit-count rules printed beside them, DF/CF, CIF, T, ST and S on one face, and on the other the log-log scales LL1–LL4 in positive and negative forms, the hyperbolic SH and TH scales, Ln, L and the folded-at-M scales DF/M and CF/M. It is a college engineering rule, and a demonstrator of it implies an engineering or advanced physics class.
2.5.4 N3-ES and N500-ES
The N3-ES “Power Log Exponential” is a dual-base log-log duplex of 1960; the N500-ES “Hi-Log” duplex of 1962 carries +LL1, −LL1, A, D, DI and K on one face and LL2, LL02, DF, CF, CIF, L, CI, C, D, LL3 and LL03 on the other (Smithsonian; Followingtherules). Both were offered as 4-ft and 7-ft demonstrators; the four-foot 500-ES in Figure 4 is one.
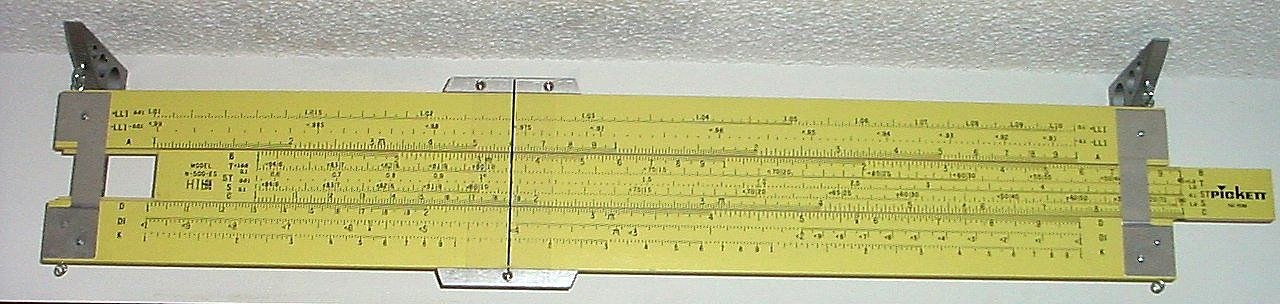
Figure 4 — A four-foot Pickett 500-ES demonstrator. Image: International Slide Rule Museum, Mike Konshak collection, https://sliderulemuseum.com/DemoSR.shtml.
2.6 What the Big Scales Gain
A demonstrator is not built for precision but for visibility, and the numbers show why it had to be so large. On a four-foot rule with 40-inch scales (four times a ten-inch rule):
Table 3 — A demonstrator is not built for precision but for visibility, and the numbers show why it had to be so large. On a four-foot rule with 40-inch scales (four times a ten-inch rule)
| Interval on C/D | Ten-inch rule | Four-foot demonstrator |
|---|---|---|
| 1 to 2 | 3.01 in | 12.04 in |
| 9 to 10 | 0.46 in | 1.83 in |
| Position of 2.34 from the left index | 3.69 in | 14.77 in |
The crowded right-hand end of the D scale — under half an inch per unit on a student rule — becomes nearly two inches, wide enough for a class twenty feet away to see where a hairline falls. In principle the 40-inch scale also reads more finely: a setting good to 0.01 inch is about 0.06% on 40 inches, against 0.23% on ten. In practice the demonstrator’s graduations are drawn thick for legibility, and nobody reads a fourth figure across a classroom. The giant was there to show how, not to compute.
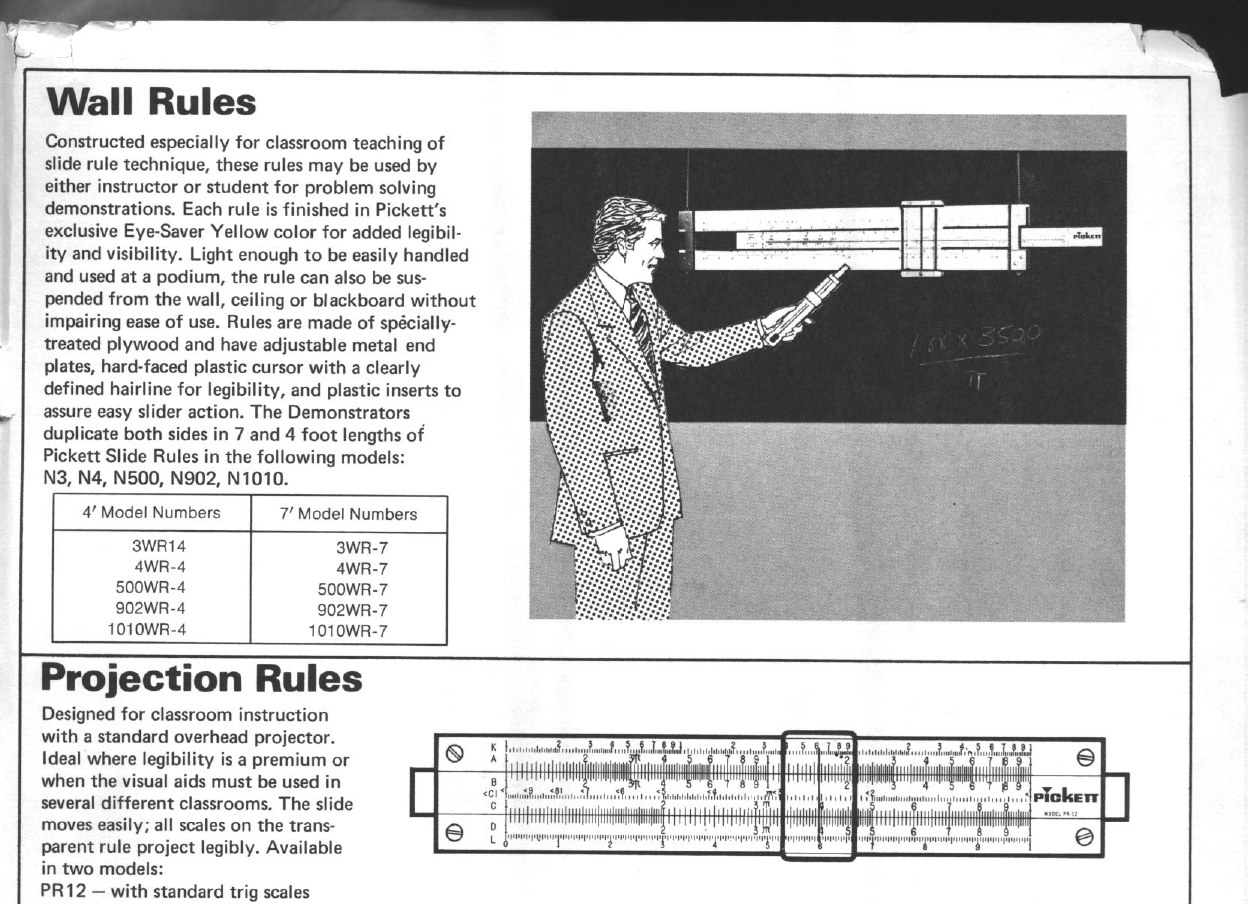
Figure 5 — Pickett’s own description of its wall rules and their catalogue numbers, with the classic installation: hung on two wires above the blackboard. Below, the PR12 projection rule that succeeded it. Image: Pickett catalogue pages in Maurice L. Hartung, Teaching Guide for Slide Rule Instruction*, Pickett Manual 601, scan from the International Slide Rule Museum, manual M175, https://sliderulemuseum.com/Manuals/M175_Pickett_TeachingGuide_601.pdf.*
Sources
- Hartung, Maurice L. Teaching Guide for Slide Rule Instruction, Pickett Manual 601 (Pickett, Inc., © 1960), catalogue pages “Pickett Basic Slide Rules,” “Wall Rules,” “Projection Rules.” ISRM manual M175 (filed in the Library). In this site’s Reference Library.
- Hartung, Maurice L. How to Use Trig Slide Rules (Pickett & Eckel, 1960) — the Model 1010 Trig and 902 Simplex Trig scales. ISRM manual M104 (filed in the Library). In this site’s Reference Library.
- International Slide Rule Museum, “Demonstration Slide Rules” — plywood thickness, aluminium bars, the Math-Master, the photographed examples. https://sliderulemuseum.com/DemoSR.shtml
- Followingtherules.info, Data Sheet MJS-p-0202 (Pickett N1010-ES Trig Demonstration, c. 1958). https://followingtherules.info/data-sheet-mjs-p-0202.html
- Cooper Hewitt, Smithsonian Design Museum, Pickett N1010-ES Trig Duplex Demonstration Slide Rule, ca. 1960, plywood and plexiglass.
- Smithsonian NMAH, Pickett N500-ES Log Log Duplex Slide Rule (694532) and N3-ES records. https://si.edu/object/pickett-n500-es-log-log-duplex-slide-rule:nmah_694532
- Interval lengths and positions computed for this volume: 40 × log 2 = 12.04 in; 40 × (1 − log 9) = 1.83 in; 40 × log 2.34 = 14.77 in; ln 10 × 0.01 / 40 = 0.058%.
Comments (0)